Bagaimana cara mencetak lampiran secara otomatis saat email tiba di Outlook?
Tutorial ini mendemonstrasikan metode untuk menggabungkan skrip VBA dan aturan Outlook untuk membantu Anda mencetak lampiran email tertentu secara otomatis saat mereka tiba di Outlook.
Secara otomatis mencetak lampiran ketika email tertentu tiba
Ibaratnya, Anda ingin mencetak lampiran email yang masuk dari pengirim tertentu secara otomatis. Anda dapat melakukan hal berikut untuk menyelesaikannya.
Langkah1: Buat skrip di Outlook
Pertama, Anda perlu membuat skrip VBA di Outlook.
1. Luncurkan Outlook Anda, tekan lain + F11 tombol secara bersamaan untuk membuka Microsoft Visual Basic untuk Aplikasi jendela.
2. Dalam Microsoft Visual Basic untuk Aplikasi jendela, klik dua kali pada Project1 > Objek Microsoft Outlook > Sesi Pandangan ini untuk membuka ThisOutlookSession (Kode) jendela, dan kemudian salin kode berikut ke jendela kode ini.
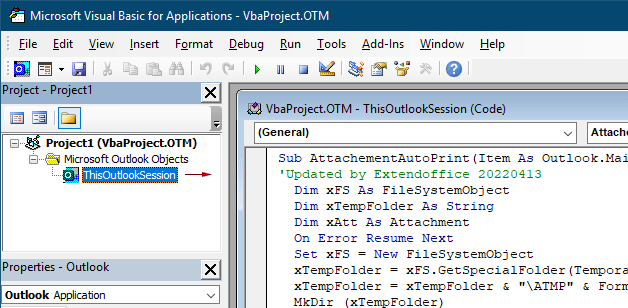
Kode VBA 1: Secara otomatis mencetak lampiran (semua jenis lampiran) saat email tiba
Sub AttachementAutoPrint(Item As Outlook.MailItem)
'Updated by Extendoffice 20230223
  Dim xFS As FileSystemObject
  Dim xTempFolder As String
  Dim xAtt As Attachment
  Dim xShell As Object
  Dim xFolder As Object, xFolderItem As Object
  Dim xFileName As String
  On Error GoTo xError
  If Item.Attachments.Count = 0 Then Exit Sub
  Set xFS = New FileSystemObject
  xTempFolder = xFS.GetSpecialFolder(TemporaryFolder)
  xTempFolder = xTempFolder & "\ATMP" & Format(Item.ReceivedTime, "yyyymmddhhmmss")
  If Not xFS.FolderExists(xTempFolder) Then
    MkDir (xTempFolder)
  End If
  Set xShell = CreateObject("Shell.Application")
  Set xFolder = xShell.NameSpace(0)
  For Each xAtt In Item.Attachments
    If IsEmbeddedAttachment(xAtt) = False Then
      xFileName = xTempFolder & "\" & xAtt.FileName
      xAtt.SaveAsFile (xFileName)
      Set xFolderItem = xFolder.ParseName(xFileName)
      xFolderItem.InvokeVerbEx ("print")
    End If
  Next xAtt
  Set xFS = Nothing
  Set xFolder = Nothing
  Set xFolderItem = Nothing
  Set xShell = Nothing
xError:
  If Err <> 0 Then
    MsgBox Err.Number & " - " & Err.Description, , "Kutools for Outlook"
    Err.Clear
  End If
Exit Sub
End Sub

Function IsEmbeddedAttachment(Attach As Attachment)
Dim xItem As MailItem
Dim xCid As String
Dim xID As String
Dim xHtml As String
On Error Resume Next
IsEmbeddedAttachment = False
Set xItem = Attach.Parent
If xItem.BodyFormat <> olFormatHTML Then Exit Function
xCid = ""
xCid = Attach.PropertyAccessor.GetProperty("http://schemas.microsoft.com/mapi/proptag/0x3712001F")
If xCid <> "" Then
    xHtml = xItem.HTMLBody
    xID = "cid:" & xCid
    If InStr(xHtml, xID) > 0 Then
        IsEmbeddedAttachment = True
    End If
End If
End Function
Catatan: Kode ini mendukung pencetakan semua jenis lampiran yang diterima dalam email. Jika Anda ingin mencetak hanya jenis lampiran yang ditentukan, seperti file pdf, harap terapkan kode VBA berikut.
Kode VBA 2: Secara otomatis mencetak jenis lampiran yang ditentukan saat email tiba
Sub AttachementAutoPrint(Item As Outlook.MailItem)
'Updated by Extendoffice 20230223
  Dim xFS As FileSystemObject
  Dim xTempFolder As String
  Dim xAtt As Attachment
  Dim xShell As Object
  Dim xFolder As Object, xFolderItem As Object
  Dim xFileType As String, xFileName As String
  On Error GoTo xError
  If Item.Attachments.Count = 0 Then Exit Sub
  Set xFS = New FileSystemObject
  xTempFolder = xFS.GetSpecialFolder(TemporaryFolder)
  xTempFolder = xTempFolder & "\ATMP" & Format(Item.ReceivedTime, "yyyymmddhhmmss")
  If Not xFS.FolderExists(xTempFolder) Then
    MkDir (xTempFolder)
  End If
  Set xShell = CreateObject("Shell.Application")
  Set xFolder = xShell.NameSpace(0)
  For Each xAtt In Item.Attachments
    If IsEmbeddedAttachment(xAtt) = False Then
      xFileName = xAtt.FileName
      xFileType = LCase$(Right$(xFileName, VBA.Len(xFileName) - VBA.InStrRev(xFileName, ".")))
      xFileName = xTempFolder & "\" & xFileName
      Select Case xFileType
        Case "pdf"   'change "pdf" to the file extension you want to print
          xAtt.SaveAsFile (xFileName)
          Set xFolderItem = xFolder.ParseName(xFileName)
          xFolderItem.InvokeVerbEx ("print")
      End Select
    End If
  Next xAtt
  Set xFS = Nothing
  Set xFolder = Nothing
  Set xFolderItem = Nothing
  Set xShell = Nothing
xError:
  If Err <> 0 Then
    MsgBox Err.Number & " - " & Err.Description, , "Kutools for Outlook"
    Err.Clear
  End If
  Exit Sub
End Sub

Function IsEmbeddedAttachment(Attach As Attachment)
Dim xItem As MailItem
Dim xCid As String
Dim xID As String
Dim xHtml As String
On Error Resume Next
IsEmbeddedAttachment = False
Set xItem = Attach.Parent
If xItem.BodyFormat <> olFormatHTML Then Exit Function
xCid = ""
xCid = Attach.PropertyAccessor.GetProperty("http://schemas.microsoft.com/mapi/proptag/0x3712001F")
If xCid <> "" Then
    xHtml = xItem.HTMLBody
    xID = "cid:" & xCid
    If InStr(xHtml, xID) > 0 Then
        IsEmbeddedAttachment = True
    End If
End If
End Function
Catatan:
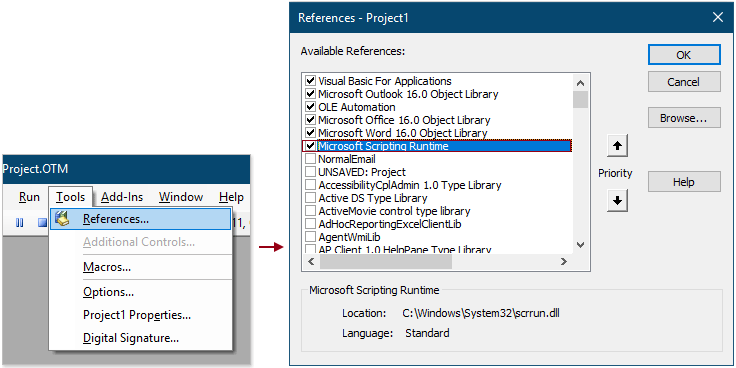
3. Silakan dan klik Tools > Referensi. Dalam bermunculan Referensi – Proyek1 kotak dialog, periksa Runtime Microsoft Scripting kotak, dan kemudian klik OK .
4. Simpan kode dan tekan lain + Q kunci untuk menutup Microsoft Visual Basic untuk Aplikasi jendela.
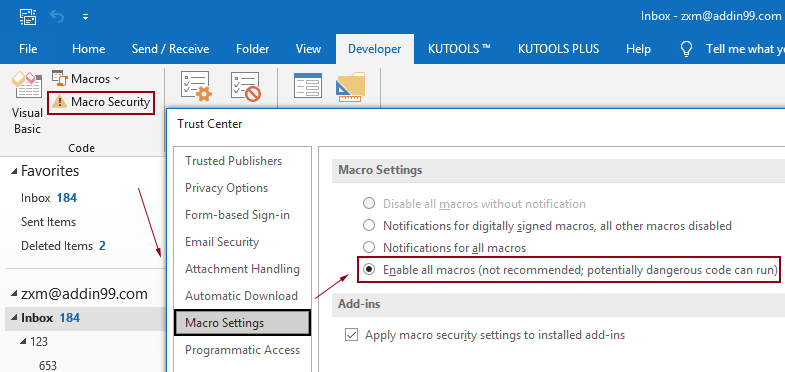
Catatan: Harap pastikan bahwa Aktifkan semua makro opsi diaktifkan di Outlook Anda. Anda dapat memeriksa opsi ini dengan mengikuti langkah-langkah yang ditunjukkan di bawah ini.
Langkah2: Buat aturan untuk menggunakan skrip
Setelah menambahkan skrip VBA di Outlook, Anda perlu membuat aturan untuk menggunakan skrip berdasarkan kondisi tertentu.
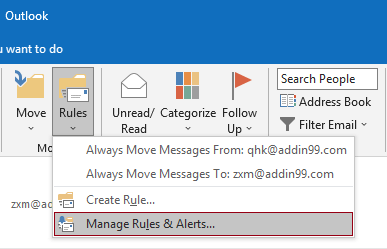
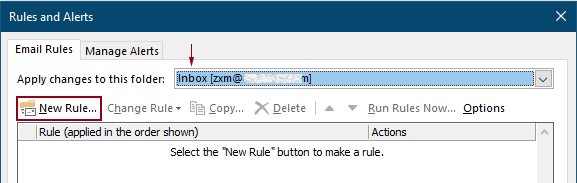
1. Buka tab Beranda, klik Peraturan > Kelola Aturan & Peringatan.
2. Dalam Aturan dan Peringatan kotak dialog, klik Aturan baru tombol untuk membuat aturan.
Tip: Jika Anda telah menambahkan beberapa akun email ke Outlook, tentukan akun di Terapkan perubahan ke folder ini daftar drop-down di mana Anda ingin menerapkan aturan. Jika tidak, itu akan diterapkan ke kotak masuk akun email yang saat ini dipilih.
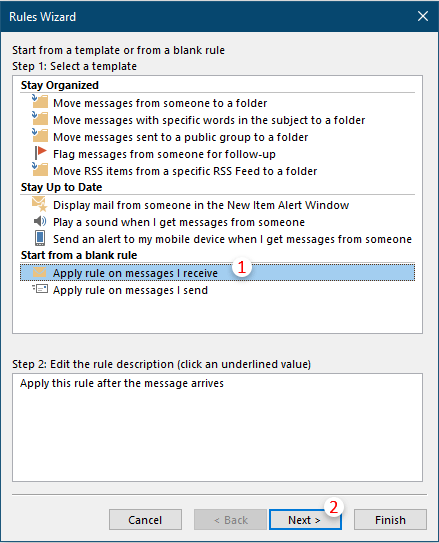
3. Yang pertama Penyihir Aturan kotak dialog, pilih Terapkan aturan pada pesan yang saya terima dalam Langkah 1 kotak, lalu klik Next.
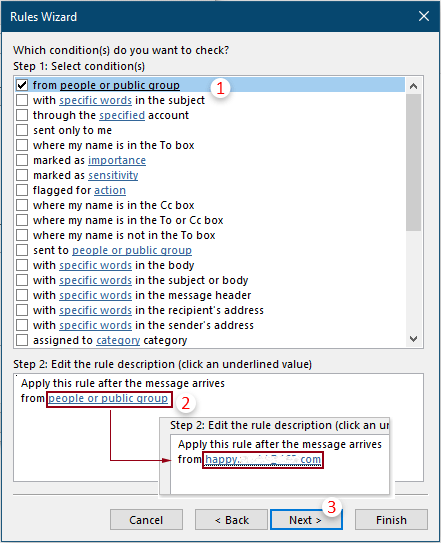
4. Di kedua Penyihir Aturan kotak dialog, Anda perlu:
5. Di urutan ketiga Penyihir Aturan kotak dialog, Anda perlu mengkonfigurasi sebagai berikut.
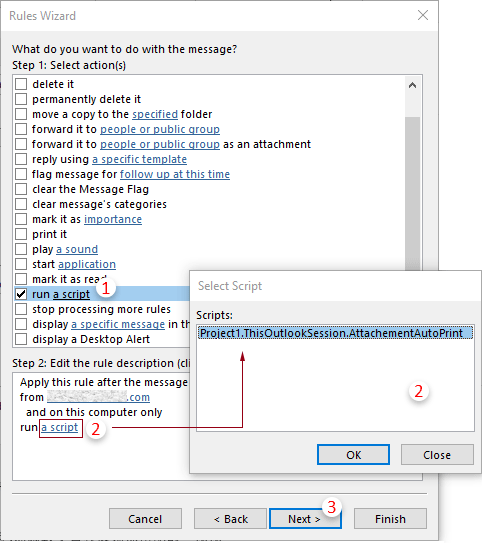
Tip: Jika "menjalankan skrip” pilihan tidak ada di . Anda Penyihir Aturan, Anda dapat menampilkannya dengan mengikuti metode yang disebutkan dalam artikel ini: pulihkan pption Run A Script yang hilang di aturan Outlook.
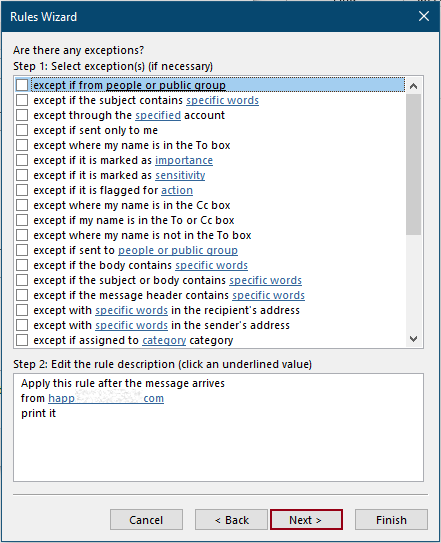
6. Kemudian lainnya Penyihir Aturan muncul meminta pengecualian. Anda dapat memilih pengecualian jika perlu, jika tidak, klik tombol Selanjutnya tombol tanpa pilihan apa pun。
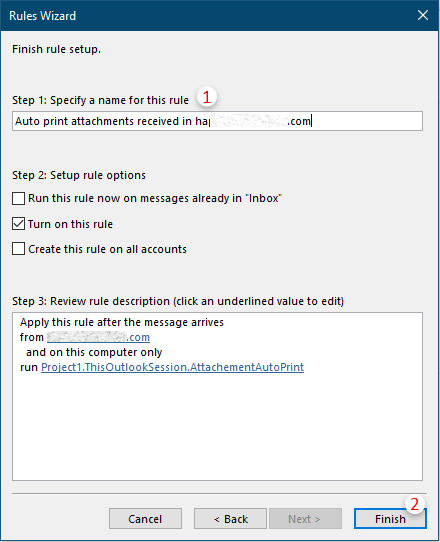
7. Terakhir Penyihir Aturan, Anda perlu menentukan nama untuk aturan tersebut, lalu klik tombol Finish .
8. Kemudian kembali ke Aturan dan Peringatan kotak dialog, Anda dapat melihat aturan yang Anda buat tercantum di dalamnya, klik OK tombol untuk menyelesaikan seluruh pengaturan.
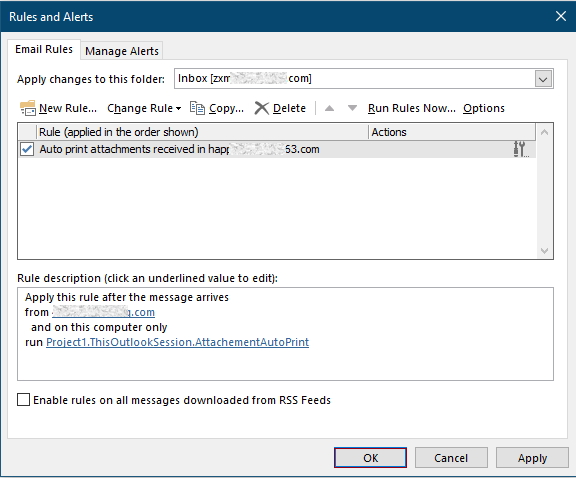
Mulai sekarang, ketika email dari orang yang ditentukan diterima, file terlampir akan dicetak secara otomatis.
Terkait artikel
Hanya Cetak Lampiran (S) Dari Satu Email Atau Email Terpilih Di Outlook
Di Outlook, Anda dapat mencetak email, tetapi apakah Anda telah mencetak lampiran hanya dari satu email atau email tertentu di Outlook? Artikel ini memperkenalkan trik untuk menyelesaikan pekerjaan ini.
Hanya Cetak Header Pesan Dari Email Di Outlook
Saat mencetak email di Outlook, itu akan mencetak header pesan dan isi pesan di email. Namun, dalam beberapa kasus khusus, Anda mungkin hanya perlu mencetak header pesan dengan subjek, pengirim, penerima, dll. Artikel ini akan memperkenalkan dua solusi untuk melakukannya.
Cetak Kalender Dalam Rentang Tanggal Tertentu/Kustom Di Outlook
Biasanya, saat mencetak kalender dalam tampilan Bulan di Outlook, secara otomatis akan memilih bulan yang berisi tanggal yang dipilih saat ini. Namun, Anda mungkin perlu mencetak kalender dalam rentang tanggal khusus, seperti 3 bulan, setengah tahun, dll. Artikel ini akan memperkenalkan solusi untuk Anda.
Cetak Kontak Dengan Gambar Di Outlook
Biasanya, gambar kontak tidak akan dicetak saat mencetak kontak di Outlook. Tetapi terkadang, akan lebih mengesankan untuk mencetak kontak dengan gambarnya. Artikel ini akan memperkenalkan beberapa solusi untuk menyelesaikannya.
Cetak Pilihan Email Di Outlook
Jika Anda menerima pesan email dan menemukan bahwa ada pilihan konten email yang perlu dicetak alih-alih mencetak seluruh pesan, apa yang akan Anda lakukan? Sebenarnya, Outlook dapat membantu Anda mencapai operasi ini dengan bantuan browser internet, seperti Firefox dan Internet Explorer. Di sini saya akan mengambil browser Internet misalnya. Silahkan simak tutorialnya berikut ini.
Alat Produktivitas Kantor Terbaik
Kutools untuk Outlook - Lebih dari 100 Fitur Canggih untuk Meningkatkan Outlook Anda
🤖 Asisten Surat AI: Email profesional instan dengan keajaiban AI--satu klik untuk mendapatkan balasan jenius, nada sempurna, penguasaan multibahasa. Ubah email dengan mudah! ...
📧 Email Otomatis: Di Luar Kantor (Tersedia untuk POP dan IMAP) / Jadwal Kirim Email / Auto CC/BCC Sesuai Aturan Saat Mengirim Email / Penerusan Otomatis (Aturan Lanjutan) / Tambah Salam Otomatis / Secara Otomatis Membagi Email Multi-Penerima menjadi Pesan Individual ...
📨 email Management: Mengingat Email dengan Mudah / Blokir Email Penipuan berdasarkan Subjek dan Lainnya / Hapus Email Duplikat / Pencarian / Konsolidasi Folder ...
📁 Lampiran Pro: Penyimpanan Batch / Pelepasan Batch / Kompres Batch / Penyimpanan otomatis / Lepaskan Otomatis / Kompres Otomatis ...
🌟 Antarmuka Ajaib: 😊Lebih Banyak Emoji Cantik dan Keren / Tingkatkan Produktivitas Outlook Anda dengan Tampilan Tab / Minimalkan Outlook Daripada Menutup ...
👍 Keajaiban sekali klik: Balas Semua dengan Lampiran Masuk / Email Anti-Phishing / 🕘Tampilkan Zona Waktu Pengirim ...
👩🏼🤝👩🏻 Kontak & Kalender: Batch Tambahkan Kontak Dari Email yang Dipilih / Bagi Grup Kontak menjadi Grup Individual / Hapus Pengingat Ulang Tahun ...
Lebih 100 Fitur Tunggu Eksplorasi Anda! Klik Di Sini untuk Menemukan Lebih Banyak.

