Loncat ke daftar isi utama

Bagaimana cara mengirim email dengan menyalin dan menempelkan rentang tertentu ke badan email di Excel?

Dalam banyak kasus, rentang konten tertentu di lembar kerja Excel mungkin berguna dalam komunikasi email Anda. Pada artikel ini, kami akan memperkenalkan metode pengiriman email dengan rentang tertentu yang ditempelkan ke badan email langsung di Excel.

Kirim email dengan rentang tertentu disisipkan ke badan email di Excel
Kirim email dengan rentang tertentu yang ditempelkan ke badan email dengan alat yang luar biasa

Tutorial lainnya untuk mengirim email di Excel ...


Kirim email dengan rentang tertentu disisipkan ke badan email di Excel

Kode VBA berikut dapat membantu Anda menyalin rentang dan menempelkannya ke badan email Outlook secara langsung di Excel. Silakan lakukan sebagai berikut.

1. Di lembar kerja yang berisi kisaran yang perlu Anda salin, tekan lain + F11 tombol secara bersamaan untuk membuka Microsoft Visual Basic untuk Aplikasi jendela.

2. Dalam pembukaan Microsoft Visual Basic untuk Aplikasi jendela, silakan klik Tools > Referensi seperti gambar di bawah ini.

3. Dalam Referensi - VBAProject kotak dialog, silakan temukan dan centang Perpustakaan Objek Microsoft Outlook opsi, dan kemudian klik OK .

4. klik Menyisipkan > Modul, lalu salin dan tempel kode VBA di bawah ini ke jendela Modul.

Kode VBA: Kirim email dengan rentang tertentu yang ditempelkan ke badan email di Excel

Sub Send_Email()
'Updated by Extendoffice 20200119
    Dim xRg As Range
    Dim I, J As Long
    Dim xAddress As String
    Dim xEmailBody As String
    Dim xMailOut As Outlook.MailItem
    Dim xOutApp As Outlook.Application    
    On Error Resume Next
    xAddress = ActiveWindow.RangeSelection.Address
    Set xRg = Application.InputBox("Please select range you need to paste into email body", "KuTools For Excel", xAddress, , , , , 8)
If xRg Is Nothing Then Exit Sub
Application.ScreenUpdating = False
    Set xOutApp = CreateObject("Outlook.Application")
    Set xMailOut = xOutApp.CreateItem(olMailItem)
    For I = 1 To xRg.Rows.Count
        For J = 1 To xRg.Columns.Count
            xEmailBody = xEmailBody & "  " & xRg.Cells(I, J).value
        Next
        xEmailBody = xEmailBody & vbNewLine
    Next
    xEmailBody = "Hi" & vbLf & vbLf & " body of message you want to add" & vbLf & vbLf & xEmailBody & vbNewLine
    With xMailOut
        .Subject = "Test"
        .To = ""
        .Body = xEmailBody
        .Display
        '.Send
    End With
    Set xMailOut = Nothing
    Set xOutApp = Nothing
    Application.ScreenUpdating = True
End Sub

Catatan:

  • 1). Harap ubah badan email sesuai xEmailBody = "Hi" & vbLf & vbLf & "isi pesan yang ingin Anda tambahkan" & vbLf & vbLf & xEmailBody & vbNewLine seperti yang Anda butuhkan
  • 2). Harap tentukan penerima email dan subjek Anda (.Untuk = dan .Subject = "test") baris dalam kode.

5. tekan F5 kunci untuk menjalankan kode. Dalam bermunculan Kutools untuk Excel kotak dialog, pilih rentang yang perlu Anda tempelkan di badan email, lalu klik OK tombol. Lihat tangkapan layar:

6. Sekarang sebuah email dibuat dengan penerima, subjek, badan dan rentang Excel yang dipilih, silakan klik Kirim tombol untuk mengirim email ini. Lihat tangkapan layar yang ditampilkan.

Note: Kode VBA hanya berfungsi saat Anda menggunakan Outlook sebagai program email Anda.


Kirim email dengan rentang tertentu yang ditempelkan ke badan email dengan alat yang luar biasa

Jika Anda tidak menggunakan Outlook dan masih ingin mengirim email langsung di Excel dengan data rentang tertentu yang ditempel di dalamnya, saya sangat merekomendasikan Mengirim email kegunaan Kutools untuk Excel untukmu. Dengan fitur ini, Anda hanya perlu mengonfigurasi server keluar dari sebuah alamat email, lalu mengirim email di Excel secara langsung melalui alamat email ini di masa mendatang.

Sebelum melamar Kutools untuk Excel, Mohon unduh dan instal terlebih dahulu.

1. Pertama, Anda perlu menyiapkan milis dengan kolom yang dibutuhkan.

  • Tips: Milis harus berisi minimal 2 baris, dan baris pertama harus berupa tajuk (Misalkan Anda ingin mengirim email ke dua alamat email di Excel, ketikkan dua alamat email ini dengan tajuk "Email" seperti gambar di bawah ini. ).
  • Cara lainnya, Anda dapat dengan mudah membuat milis dengan ekstensi Buat Milis fitur.

2. Pilih kisaran Anda akan menambahkan data ke badan email dan tekan Ctrl + C kunci untuk menyalinnya

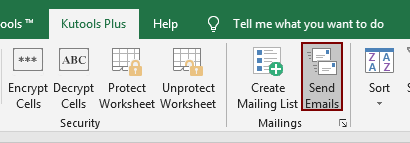
3. Pilih seluruh milis (termasuk header), klik Kutools Ditambah > Mengirim email. Lihat tangkapan layar:

4. Kemudian Mengirim email kotak dialog muncul.

  • 4.1) Item dari milis yang dipilih diisi di kolom yang sesuai (Anda dapat menambahkan lebih banyak kolom ke milis sesuai kebutuhan);
  • 4.2) Klik pada kotak badan email, tekan Ctrl + V kunci untuk menempelkan data rentang yang dipilih ke dalamnya. Setelah itu tambahkan konten lain sesuai kebutuhan;
  • 4.3 Hapus centang Kirim email melalui Outlook kotak;
  • 2.4) Klik Pengaturan Server Keluar tombol. Lihat tangkapan layar:

5. Kemudian Pengaturan Server Keluar (SMTP) - Skema Baru kotak dialog muncul. Silakan isi alamat email dengan pengaturan servernya, tentukan folder untuk menyimpan semua surat terkirim setelah memeriksa Simpan email terkirim ke kotak, dan kemudian klik OK tombol untuk menyimpan pengaturan.

6. Ketika kembali ke Mengirim email kotak dialog, klik Kirim tombol untuk mengirim email.

Mulai sekarang, Anda dapat mengirim email dengan fitur ini di Excel secara langsung.

  Jika Anda ingin memiliki uji coba gratis (30 hari) dari utilitas ini, silahkan klik untuk mendownloadnya, lalu lanjutkan untuk menerapkan operasi sesuai langkah di atas.


Artikel terkait:

Kirim email ke alamat email yang ditentukan dalam sel di Excel
Misalkan Anda memiliki daftar alamat email, dan Anda ingin mengirim pesan email ke alamat email ini secara massal langsung di Excel. Bagaimana cara mencapainya? Artikel ini akan menunjukkan metode pengiriman email ke beberapa alamat email yang ditentukan dalam sel di Excel.

Sisipkan tanda tangan Outlook saat mengirim email di Excel
Misalkan Anda ingin mengirim email langsung di Excel, bagaimana Anda bisa menambahkan tanda tangan Outlook default di email mereka? Artikel ini menyediakan dua metode untuk membantu Anda menambahkan tanda tangan Outlook saat mengirim email di Excel.

Kirim email dengan beberapa lampiran yang dilampirkan di Excel
Artikel ini membahas tentang mengirim email melalui Outlook dengan beberapa lampiran yang dilampirkan di Excel.

Kirim email jika tanggal jatuh tempo sudah terpenuhi di Excel
Misalnya, jika tanggal jatuh tempo di kolom C kurang dari atau sama dengan 7 hari (tanggal sekarang adalah 2017/9/13), maka kirim pengingat email ke penerima yang ditentukan di kolom A dengan konten yang ditentukan di kolom B.Cara mencapainya? Artikel ini akan memberikan metode VBA untuk mengatasinya secara detail.

Kirim email secara otomatis berdasarkan nilai sel di Excel
Misalkan Anda ingin mengirim email melalui Outlook ke penerima tertentu berdasarkan nilai sel tertentu di Excel. Misalnya, jika nilai sel D7 di lembar kerja lebih besar dari 200, maka email dibuat secara otomatis. Artikel ini memperkenalkan metode VBA bagi Anda untuk menyelesaikan masalah ini dengan cepat.

Tutorial lainnya untuk mengirim email di Excel ...

Alat Produktivitas Kantor Terbaik

馃 Kutools AI Ajudan: Merevolusi analisis data berdasarkan: Eksekusi Cerdas   |  Hasilkan Kode  |  Buat Rumus Khusus  |  Analisis Data dan Hasilkan Grafik  |  Aktifkan Fungsi Kutools...
Fitur Populer: Temukan, Sorot, atau Identifikasi Duplikat   |  Hapus Baris Kosong   |  Gabungkan Kolom atau Sel tanpa Kehilangan Data   |   Putaran tanpa Formula ...
Pencarian Super: VLookup Beberapa Kriteria    VLookup Nilai Berganda  |   VLookup di Beberapa Lembar   |   Pencarian Fuzzy ....
Daftar Drop-down Lanjutan: Buat Daftar Drop Down dengan Cepat   |  Daftar Drop Down yang Bergantung   |  Multi-pilih Drop Down List ....
Manajer Kolom: Tambahkan Jumlah Kolom Tertentu  |  Pindahkan Kolom  |  Alihkan Status Visibilitas Kolom Tersembunyi  |  Bandingkan Rentang & Kolom ...
Fitur Unggulan: Fokus Kisi   |  Tampilan Desain   |   Bar Formula Besar    Manajer Buku Kerja & Lembar   |  Perpustakaan Sumberdaya (Teks otomatis)   |  Pemetik tanggal   |  Gabungkan Lembar Kerja   |  Enkripsi/Dekripsi Sel    Kirim Email berdasarkan Daftar   |  Filter Super   |   Filter Khusus (filter tebal/miring/coret...) ...
15 Perangkat Teratas12 Teks Tools (Tambahkan Teks, Hapus Karakter, ...)   |   50 + Grafik jenis (Gantt Chart, ...)   |   40+ Praktis Rumus (Hitung usia berdasarkan ulang tahun, ...)   |   19 Insersi Tools (Masukkan Kode QR, Sisipkan Gambar dari Jalur, ...)   |   12 Konversi Tools (Angka ke Kata, Konversi Mata Uang, ...)   |   7 Gabungkan & Pisahkan Tools (Lanjutan Gabungkan Baris, Pisahkan Sel, ...)   |   ... dan banyak lagi

Tingkatkan Keterampilan Excel Anda dengan Kutools for Excel, dan Rasakan Efisiensi yang Belum Pernah Ada Sebelumnya. Kutools for Excel Menawarkan Lebih dari 300 Fitur Lanjutan untuk Meningkatkan Produktivitas dan Menghemat Waktu.  Klik Di Sini untuk Mendapatkan Fitur yang Paling Anda Butuhkan...

Deskripsi Produk


Tab Office Membawa antarmuka Tab ke Office, dan Membuat Pekerjaan Anda Jauh Lebih Mudah

  • Aktifkan pengeditan dan pembacaan tab di Word, Excel, PowerPoint, Publisher, Access, Visio, dan Project.
  • Buka dan buat banyak dokumen di tab baru di jendela yang sama, bukan di jendela baru.
  • Meningkatkan produktivitas Anda sebesar 50%, dan mengurangi ratusan klik mouse untuk Anda setiap hari!
Comments (22)
Rated 4.5 out of 5 1 ratings
This comment was minimized by the moderator on the site
The only issue is that the format of the table is not maintained in the mail. Can you let me know how do we preserve the format of the table in the mail, I have the same issue, could you see if you could update it please, otherwise this is excellent.
Many thanks
Rated 4.5 out of 5
This comment was minimized by the moderator on the site
Hi Andy Mitchell,
If you want to maintain the format of the table, the following VBA script can do you a favor. Please give it a try. Thank you.
Sub Send_Email()
'Updated by Extendoffice 20220616
    Dim xRg As Range
    Dim I, J As Long
    Dim xAddress As String
    Dim xMailOut As Object
    Dim xOutApp As Object
    On Error Resume Next
    Set xOutApp = CreateObject("Outlook.Application")
    Set xMailOut = xOutApp.CreateItem(olMailItem)
    xAddress = ActiveWindow.RangeSelection.Address
    Set xRg = Application.InputBox("Please select range you need to paste into email body", "KuTools For Excel", xAddress, , , , , 8)
If xRg Is Nothing Then Exit Sub
Application.ScreenUpdating = False
    Set xOutApp = CreateObject("Outlook.Application")
    Set xMailOut = xOutApp.CreateItem(olMailItem)
    With xMailOut
        .Subject = "Test"
        .To = ""
        .HTMLBody = RangetoHTML(xRg)
        .Display
        '.Send
    End With
    Set xMailOut = Nothing
    Set xOutApp = Nothing
    Application.ScreenUpdating = True
End Sub

 ' The following VBA script is cited from this page:
 ' https://stackoverflow.com/questions/18663127/paste-excel-range-in-outlook
Function RangetoHTML(rng As Range)
' By Ron de Bruin.
    Dim fso As Object
    Dim ts As Object
    Dim TempFile As String
    Dim TempWB As Workbook

    TempFile = Environ$("temp") & "/" & Format(Now, "dd-mm-yy h-mm-ss") & ".htm"

    'Copy the range and create a new workbook to past the data in
    rng.Copy
    Set TempWB = Workbooks.Add(1)
    With TempWB.Sheets(1)
        .Cells(1).PasteSpecial Paste:=8
        .Cells(1).PasteSpecial xlPasteValues, , False, False
        .Cells(1).PasteSpecial xlPasteFormats, , False, False
        .Cells(1).Select
        Application.CutCopyMode = False
        On Error Resume Next
        .DrawingObjects.Visible = True
        .DrawingObjects.Delete
        On Error GoTo 0
    End With

    'Publish the sheet to a htm file
    With TempWB.PublishObjects.Add( _
         SourceType:=xlSourceRange, _
         Filename:=TempFile, _
         Sheet:=TempWB.Sheets(1).Name, _
         Source:=TempWB.Sheets(1).UsedRange.Address, _
         HtmlType:=xlHtmlStatic)
        .Publish (True)
    End With

    'Read all data from the htm file into RangetoHTML
    Set fso = CreateObject("Scripting.FileSystemObject")
    Set ts = fso.GetFile(TempFile).OpenAsTextStream(1, -2)
    RangetoHTML = ts.ReadAll
    ts.Close
    RangetoHTML = Replace(RangetoHTML, "align=center x:publishsource=", _
                          "align=left x:publishsource=")

    'Close TempWB
    TempWB.Close savechanges:=False

    'Delete the htm file we used in this function
    Kill TempFile

    Set ts = Nothing
    Set fso = Nothing
    Set TempWB = Nothing
End Function
This comment was minimized by the moderator on the site
This worked perfectly, thank you so much.
I can now add my spin on it to get it doing what I need.
This comment was minimized by the moderator on the site
Hi Paul Johnson,

Very happy to help you solve the problem. Have a good day at work.
This comment was minimized by the moderator on the site
hello,
can you help me on below
I have create excel sheet & updated 10 supplier mail detailI have send mail through excel to all 10 supplier with individual sheet attachment with individual mail.
I want to paste excel data in outlook body instead of attachment in mail
can any one help me
This comment was minimized by the moderator on the site
Hi,
Instead of selecting the range, I want to select multiple pivots in the excel.
can you please help me.
This comment was minimized by the moderator on the site
Hi,
Instead of selecting the range manually, I want to select the range automatically.
This comment was minimized by the moderator on the site
Hi Raman,
In the below code, please replace the range "A1:C5" in line Set xRg = Range("A1:C5") with your own range.

Sub Send_Email()
Dim xRg As Range
Dim I, J As Long
Dim xAddress As String
Dim xEmailBody As String
Dim xMailOut As Outlook.MailItem
Dim xOutApp As Outlook.Application
On Error Resume Next
xAddress = ActiveWindow.RangeSelection.Address
Set xRg = Range("A1:C5")
If xRg Is Nothing Then Exit Sub
Application.ScreenUpdating = False
Set xOutApp = CreateObject("Outlook.Application")
Set xMailOut = xOutApp.CreateItem(olMailItem)
For I = 1 To xRg.Rows.Count
For J = 1 To xRg.Columns.Count
xEmailBody = xEmailBody & " " & xRg.Cells(I, J).Value
Next
xEmailBody = xEmailBody & vbNewLine
Next
xEmailBody = "Hi" & vbLf & vbLf & " body of message you want to add" & vbLf & vbLf & xEmailBody & vbNewLine
With xMailOut
.Subject = "Test"
.To = ""
.Body = xEmailBody
.Display
'.Send
End With
Set xMailOut = Nothing
Set xOutApp = Nothing
Application.ScreenUpdating = True
End Sub
This comment was minimized by the moderator on the site
Hi experts, Do we have updates on how the format maintained?
This comment was minimized by the moderator on the site
Hi Ther,
Can't figure it out. Sorry for that.
This comment was minimized by the moderator on the site
i am seeing a compile error (User-defined type not defined". Please help me out to overcome this.
This comment was minimized by the moderator on the site
Hi,
Please get into the Reference window by clicking Tools > references. Scroll down to find and check the Microsoft Outlook Object Library box and click the OK button to finish the setting.
This comment was minimized by the moderator on the site
this is pasting as a text. Kindly suggest how to send the table or the same format which is copied from the excel.
This comment was minimized by the moderator on the site
Code to send automatically after selecting after ok
This comment was minimized by the moderator on the site
Hi
This code is vary excellent, by using the code i have completed my 90% of my project.
I have same issue as mentioned by Anirudh that is table formatting. How can i format the table in email.
Please help me......
This comment was minimized by the moderator on the site
Good Day,
The problem can't be solved yet. Sorry for the inconvenience and thank you for your comment.
This comment was minimized by the moderator on the site
Hi, Is there any update on below.......
This comment was minimized by the moderator on the site
Hi, Also I Wanted code for "Filter by Date".
I am working on project, on that project I wanted to filter the data by the date, actually we have filter/hide the and last 05 days to current date data and we have highlight all other data.
Please help me to complete this project.
Your help is very great-full for me.
This comment was minimized by the moderator on the site
This is great. It is working as expected. The only issue is that the format of the table is not maintained in the mail. Can you let me know how do we preserve the format of the table in the mail
There are no comments posted here yet
Load More
Please leave your comments in English
Posting as Guest
Rate this post:
0   Characters
Suggested Locations