Bagaimana cara membuat kalender bulanan / tahunan di Excel?
Dalam beberapa waktu, Anda perlu membuat kalender bulan atau tahun tertentu di Excel, bagaimana Anda bisa menyelesaikannya dengan cepat? Tutorial ini memperkenalkan trik membuat kalender bulanan atau tahunan dengan cepat di Excel.
Buat kalender bulanan atau tahunan dengan Template Excel
Buat kalender bulanan dengan VBA
Mudah membuat kalender bulanan atau tahunan dengan Kalender Abadi ![]()
 Buat kalender bulanan atau tahunan dengan Template Excel

Di Excel, Anda bisa menggunakan templat kalender untuk membuat kalender bulanan atau tahunan.
1. Di Excel 2010/2013, klik File > New, di Excel 2007, klik Tombol Kantor > New, lalu di bagian kanan jendela yang muncul, ketik kalender ke mesin pencari. Lihat tangkapan layar:
Di Excel 2010/2013
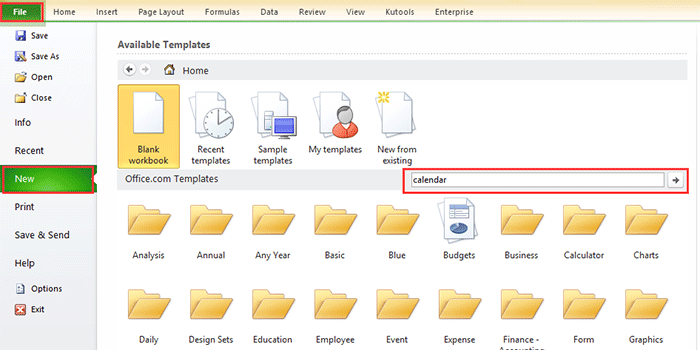
Di Excel 2007

2. tekan Enter, lalu beberapa jenis kalender dicantumkan di jendela. Pilih satu jenis kalender yang Anda butuhkan, dan klik Unduh (atau Buat) di panel kanan. Lihat tangkapan layar:

Sekarang kalender dibuat di buku kerja baru. Lihat tangkapan layar:

Buat kalender bulanan dengan VBA
Terkadang, Anda perlu membuat kalender satu bulan untuk bulan tertentu, seperti Jan 2015. Mungkin sulit menemukan template kalender dengan metode di atas. Di sini saya memperkenalkan kode VBA untuk membantu Anda membuat kalender bulanan tertentu.
1. tekan Alt + F11 kunci untuk membuka Microsoft Visual Basic untuk Aplikasi window, klik Menyisipkan > Modul, lalu salin dan tempel kode VBA di bawah ini ke jendela.
VBA: Buat kalender bulanan.
Sub CalendarMaker()

       ' Unprotect sheet if had previous calendar to prevent error.
       ActiveSheet.Protect DrawingObjects:=False, Contents:=False, _
          Scenarios:=False
       ' Prevent screen flashing while drawing calendar.
       Application.ScreenUpdating = False
       ' Set up error trapping.
       On Error GoTo MyErrorTrap
       ' Clear area a1:g14 including any previous calendar.
       Range("a1:g14").Clear
       ' Use InputBox to get desired month and year and set variable
       ' MyInput.
       MyInput = InputBox("Type in Month and year for Calendar ")
       ' Allow user to end macro with Cancel in InputBox.
       If MyInput = "" Then Exit Sub
       ' Get the date value of the beginning of inputted month.
       StartDay = DateValue(MyInput)
       ' Check if valid date but not the first of the month
       ' -- if so, reset StartDay to first day of month.
       If Day(StartDay) <> 1 Then
           StartDay = DateValue(Month(StartDay) & "/1/" & _
               Year(StartDay))
       End If
       ' Prepare cell for Month and Year as fully spelled out.
       Range("a1").NumberFormat = "mmmm yyyy"
       ' Center the Month and Year label across a1:g1 with appropriate
       ' size, height and bolding.
       With Range("a1:g1")
           .HorizontalAlignment = xlCenterAcrossSelection
           .VerticalAlignment = xlCenter
           .Font.Size = 18
           .Font.Bold = True
           .RowHeight = 35
       End With
       ' Prepare a2:g2 for day of week labels with centering, size,
       ' height and bolding.
       With Range("a2:g2")
           .ColumnWidth = 11
           .VerticalAlignment = xlCenter
           .HorizontalAlignment = xlCenter
           .VerticalAlignment = xlCenter
           .Orientation = xlHorizontal
           .Font.Size = 12
           .Font.Bold = True
           .RowHeight = 20
       End With
       ' Put days of week in a2:g2.
       Range("a2") = "Sunday"
       Range("b2") = "Monday"
       Range("c2") = "Tuesday"
       Range("d2") = "Wednesday"
       Range("e2") = "Thursday"
       Range("f2") = "Friday"
       Range("g2") = "Saturday"
       ' Prepare a3:g7 for dates with left/top alignment, size, height
       ' and bolding.
       With Range("a3:g8")
           .HorizontalAlignment = xlRight
           .VerticalAlignment = xlTop
           .Font.Size = 18
           .Font.Bold = True
           .RowHeight = 21
       End With
       ' Put inputted month and year fully spelling out into "a1".
       Range("a1").Value = Application.Text(MyInput, "mmmm yyyy")
       ' Set variable and get which day of the week the month starts.
       DayofWeek = WeekDay(StartDay)
       ' Set variables to identify the year and month as separate
       ' variables.
       CurYear = Year(StartDay)
       CurMonth = Month(StartDay)
       ' Set variable and calculate the first day of the next month.
       FinalDay = DateSerial(CurYear, CurMonth + 1, 1)
       ' Place a "1" in cell position of the first day of the chosen
       ' month based on DayofWeek.
       Select Case DayofWeek
           Case 1
               Range("a3").Value = 1
           Case 2
               Range("b3").Value = 1
           Case 3
               Range("c3").Value = 1
           Case 4
               Range("d3").Value = 1
           Case 5
               Range("e3").Value = 1
           Case 6
               Range("f3").Value = 1
           Case 7
               Range("g3").Value = 1
       End Select
       ' Loop through range a3:g8 incrementing each cell after the "1"
       ' cell.
       For Each cell In Range("a3:g8")
           RowCell = cell.Row
           ColCell = cell.Column
           ' Do if "1" is in first column.
           If cell.Column = 1 And cell.Row = 3 Then
           ' Do if current cell is not in 1st column.
           ElseIf cell.Column <> 1 Then
               If cell.Offset(0, -1).Value >= 1 Then
                   cell.Value = cell.Offset(0, -1).Value + 1
                   ' Stop when the last day of the month has been
                   ' entered.
                   If cell.Value > (FinalDay - StartDay) Then
                       cell.Value = ""
                       ' Exit loop when calendar has correct number of
                       ' days shown.
                       Exit For
                   End If
               End If
           ' Do only if current cell is not in Row 3 and is in Column 1.
           ElseIf cell.Row > 3 And cell.Column = 1 Then
               cell.Value = cell.Offset(-1, 6).Value + 1
               ' Stop when the last day of the month has been entered.
               If cell.Value > (FinalDay - StartDay) Then
                   cell.Value = ""
                   ' Exit loop when calendar has correct number of days
                   ' shown.
                   Exit For
               End If
           End If
       Next

       ' Create Entry cells, format them centered, wrap text, and border
       ' around days.
       For x = 0 To 5
           Range("A4").Offset(x * 2, 0).EntireRow.Insert
           With Range("A4:G4").Offset(x * 2, 0)
               .RowHeight = 65
               .HorizontalAlignment = xlCenter
               .VerticalAlignment = xlTop
               .WrapText = True
               .Font.Size = 10
               .Font.Bold = False
               ' Unlock these cells to be able to enter text later after
               ' sheet is protected.
               .Locked = False
           End With
           ' Put border around the block of dates.
           With Range("A3").Offset(x * 2, 0).Resize(2, _
           7).Borders(xlLeft)
               .Weight = xlThick
               .ColorIndex = xlAutomatic
           End With

           With Range("A3").Offset(x * 2, 0).Resize(2, _
           7).Borders(xlRight)
               .Weight = xlThick
               .ColorIndex = xlAutomatic
           End With
           Range("A3").Offset(x * 2, 0).Resize(2, 7).BorderAround _
              Weight:=xlThick, ColorIndex:=xlAutomatic
       Next
       If Range("A13").Value = "" Then Range("A13").Offset(0, 0) _
          .Resize(2, 8).EntireRow.Delete
       ' Turn off gridlines.
       ActiveWindow.DisplayGridlines = False
       ' Protect sheet to prevent overwriting the dates.
       ActiveSheet.Protect DrawingObjects:=True, Contents:=True, _
          Scenarios:=True

       ' Resize window to show all of calendar (may have to be adjusted
       ' for video configuration).
       ActiveWindow.WindowState = xlMaximized
       ActiveWindow.ScrollRow = 1

       ' Allow screen to redraw with calendar showing.
       Application.ScreenUpdating = True
       ' Prevent going to error trap unless error found by exiting Sub
       ' here.
       Exit Sub
   ' Error causes msgbox to indicate the problem, provides new input box,
   ' and resumes at the line that caused the error.
   MyErrorTrap:
       MsgBox "You may not have entered your Month and Year correctly." _
           & Chr(13) & "Spell the Month correctly" _
           & " (or use 3 letter abbreviation)" _
           & Chr(13) & "and 4 digits for the Year"
       MyInput = InputBox("Type in Month and year for Calendar")
       If MyInput = "" Then Exit Sub
       Resume
   End Sub
VBA berasal dari web ini https://support.microsoft.com/en-us/kb/150774
2. tekan F5 kunci atau Run tombol, dan dialog muncul untuk mengingatkan Anda mengetik bulan tertentu Anda perlu membuat kalender, lihat tangkapan layar:

3. klik OK. Sekarang kalender Jan 2015 dibuat di lembar aktif.

Namun pada cara-cara di atas terdapat beberapa batasan, misalnya jika ingin membuat kalender dari Jan sampai Mei sekaligus, Anda perlu membuat kalender sebanyak lima kali dengan dua cara diatas. Sekarang saya memperkenalkan utilitas praktis untuk menyelesaikannya dengan cepat dan mudah
Mudah membuat kalender bulanan atau tahunan dengan Kalender Abadi
Kalender abadi adalah salah satu utilitas yang kuat di Kutools untuk Excel, dan ini dapat membantu Anda dengan cepat membuat kalender bulanan atau tahunan di Excel sekaligus.
| Kutools untuk Excel, dengan lebih dari 300 fungsi praktis, membuat pekerjaan Anda lebih mudah. | ||
1. klik Enterprise > Lembar Kerja > Kalender abadi. lihat tangkapan layar:

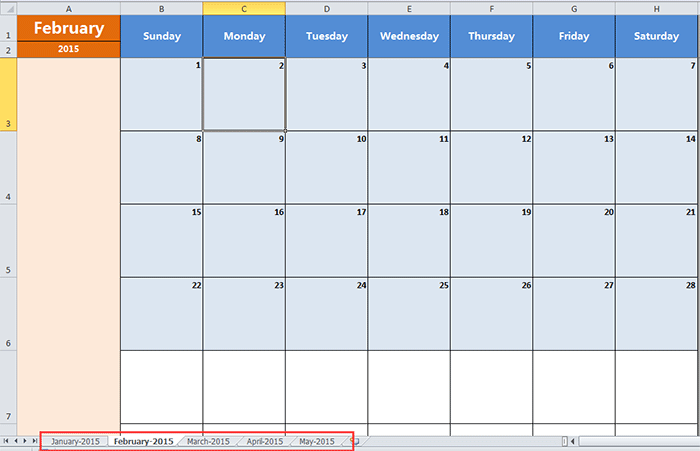
2. Pada dialog popping, tentukan durasi bulan yang Anda inginkan untuk membuat kalender, dan klik membuat. Lihat tangkapan layar:

Kemudian buku kerja baru dibuat dengan lima lembar kerja kalender. Lihat tangkapan layar:
olymp trade indonesiaTip:
Jika Anda hanya ingin membuat kalender bulan tertentu, Anda hanya perlu memilih bulan yang sama di kotak teks Dari dan Ke di dialog.
Klik di sini untuk mengetahui lebih banyak tentang Kalender Abadi
Alat Produktivitas Kantor Terbaik
Tingkatkan Keterampilan Excel Anda dengan Kutools for Excel, dan Rasakan Efisiensi yang Belum Pernah Ada Sebelumnya. Kutools for Excel Menawarkan Lebih dari 300 Fitur Lanjutan untuk Meningkatkan Produktivitas dan Menghemat Waktu. Klik Di Sini untuk Mendapatkan Fitur yang Paling Anda Butuhkan...
")
Tab Office Membawa antarmuka Tab ke Office, dan Membuat Pekerjaan Anda Jauh Lebih Mudah
- Aktifkan pengeditan dan pembacaan tab di Word, Excel, PowerPoint, Publisher, Access, Visio, dan Project.
- Buka dan buat banyak dokumen di tab baru di jendela yang sama, bukan di jendela baru.
- Meningkatkan produktivitas Anda sebesar 50%, dan mengurangi ratusan klik mouse untuk Anda setiap hari!
")