Bagaimana cara menetapkan kategori ke email keluar di Outlook?
Artikel ini menyediakan tiga metode untuk menetapkan kategori ke email keluar di Outlook.
Tetapkan kategori secara manual ke email keluar
Tetapkan kategori secara manual ke email keluar dengan kode VBA
Secara otomatis menetapkan kategori ke email keluar dengan membuat aturan
Tetapkan kategori secara manual ke email keluar
Anda dapat menetapkan kategori secara manual ke email keluar di Outlook. Silakan lakukan sebagai berikut.
1. Di jendela email baru, klik Opsi Pesan tombol di Tag kelompok di bawah Sambutan dari Manajer Umum PT. LUHAI INDUSTRIAL tab. Lihat tangkapan layar:

2. Dalam Properties kotak dialog, pilih kategori dari Kategori daftar drop-down, dan kemudian klik Penyelesaian .

3. Tulis email Anda dan kirimkan. Dan email dengan kategori tertentu ditetapkan untuk pesan keluar ini di folder Item Terkirim di Outlook Anda.
Tetapkan kategori secara manual ke email keluar dengan kode VBA
Kemudian di bawah kode VBA dapat membantu Anda dengan mudah menetapkan kategori ke email keluar di Outlook. Silakan lakukan sebagai berikut.
1. tekan lain + F11 kunci untuk membuka Microsoft Visual Basic untuk Aplikasi jendela.
2. Dalam Microsoft Visual Basic untuk Aplikasi jendela, klik dua kali untuk membuka Sesi Pandangan ini jendela kode, lalu salin kode VBA di bawah ini ke jendela kode.
Kode VBA 1: Tetapkan kategori secara manual ke email keluar
Private Sub Application_ItemSend(ByVal Item As Object, Cancel As Boolean)
Dim xNewEmail As MailItem
If Item.Class = olMail Then
    Set NewMail = Item
   NewMail.ShowCategoriesDialog
End If
Set xNewEmail = Nothing
End Sub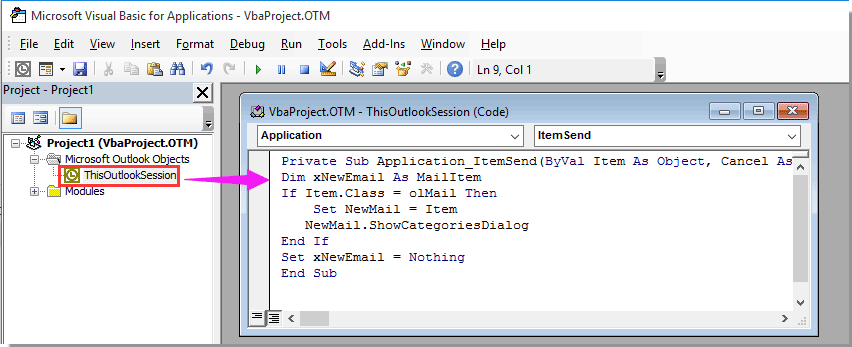
3. tekan lain + Q kunci untuk menutup Microsoft Visual Basic untuk Aplikasi jendela.
4. Setiap kali Anda mengklik Kirim tombol di email penulisan, Kategori Warna kotak dialog akan ditampilkan. Pilih kategori yang Anda butuhkan dan klik OK tombol. Lihat tangkapan layar:

Selain itu, Anda dapat menambahkan skrip VBA di bawah ini ke Bilah Alat Akses Cepat untuk menetapkan kategori dengan mudah ke email keluar di Outlook.
1. Setelah membuka Sesi Pandangan ini jendela kode, salin di bawah kode VBA ke jendela Kode.
Kode VBA 2: Tetapkan kategori secara manual ke email keluar
Sub SpecifyCategoryforNewEmail()
Dim xNewEmail As MailItem
Dim xItem As Object
Set xItem = Outlook.Application.ActiveInspector.CurrentItem
If xItem.Class = olMail Then
    Set xNewEmail = xItem
    xNewEmail.ShowCategoriesDialog
End If
Set xNewEmail = Nothing
End Sub
2. tekan lain + Q kunci untuk keluar dari Microsoft Visual Basic untuk Aplikasi jendela.
3. Buat email baru, klik Sesuaikan Bilah Alat Akses Cepat tombol, lalu pilih Lebih Banyak Perintah dari daftar drop-down

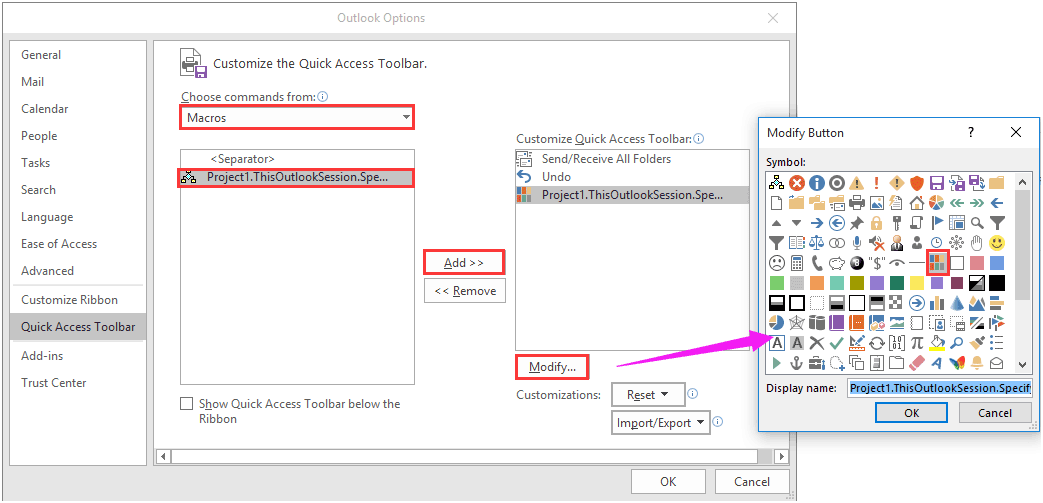
4. Dalam Pilihan Outlook jendela, Anda perlu:
4.1 Pilih Macro dari Pilih perintah dari daftar drop-down;
4.2 Pilih Project1 di kotak teks kiri dan klik Add tombol;
4.3 Pilih Project1 di kotak kanan, klik memodifikasi tombol dan ubah tombol simbol ke makro;
4.4 Klik tombol OK tombol di Pilihan Outlook jendela untuk menyimpan perubahan. Lihat tangkapan layar:
5. Mulai sekarang, jika Anda ingin menetapkan kategori ke email yang sedang Anda buat, klik saja  di pita untuk membuka file Kategori Warna kotak dialog, lalu pilih kategori untuk email ini. Lihat tangkapan layar:

Secara otomatis menetapkan kategori ke email keluar dengan membuat aturan
Jika Anda ingin selalu menetapkan kategori ke email yang dikirim ke penerima tertentu, metode di bawah ini dapat membantu Anda.
1. klik Peraturan > Aturan & Peringatan Manajer di tab Beranda.

2. Dalam kotak dialog Rules and Alerts, klik tombol New Rule. Lihat tangkapan layar:

3. Yang pertama Penyihir Aturan kotak dialog, klik Terapkan aturan pada pesan yang saya kirim pilihan dalam Mulai dari aturan kosong bagian, dan kemudian klik Selanjutnya .

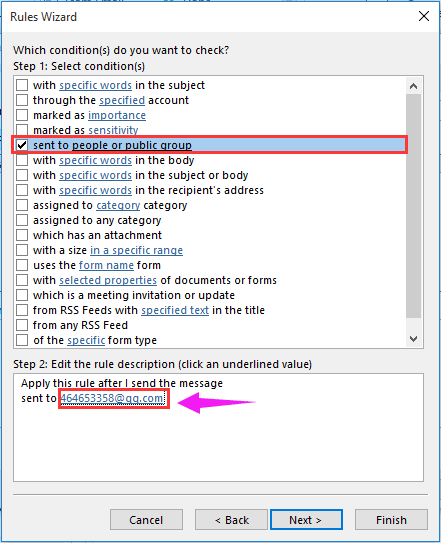
4. Di kedua Penyihir Aturan kotak dialog, periksa dikirim ke orang atau kelompok publik kotak di Langkah 1, dan tentukan alamat email penerima di Langkah 2, dan terakhir klik Selanjutnya tombol. Lihat tangkapan layar:
5. Di urutan ketiga Penyihir Aturan kotak dialog, periksa tetapkan ke kategori kategori kotak di Langkah 1, pilih kategori untuk aturan di Langkah 2, lalu klik Selanjutnya .

6. Klik Selanjutnya tombol langsung di keempat Penyihir Aturan kotak dialog tanpa memilih opsi apa pun.
7. Terakhir Penyihir Aturan kotak dialog, beri nama aturan yang Anda butuhkan, lalu klik Finish tombol. Lihat tangkapan layar:

Mulai sekarang, saat mengirim email ke penerima yang ditentukan ini, email akan ditetapkan oleh kategori tertentu secara otomatis.
Artikel terkait:
- Bagaimana cara menyimpan kategori asli saat membalas atau meneruskan email di Outlook?
- Bagaimana cara memindahkan email ke folder tertentu setelah menetapkan kategori tertentu di Outlook?
Alat Produktivitas Kantor Terbaik
Tingkatkan Keterampilan Excel Anda dengan Kutools for Excel, dan Rasakan Efisiensi yang Belum Pernah Ada Sebelumnya. Kutools for Excel Menawarkan Lebih dari 300 Fitur Lanjutan untuk Meningkatkan Produktivitas dan Menghemat Waktu. Klik Di Sini untuk Mendapatkan Fitur yang Paling Anda Butuhkan...
")
Tab Office Membawa antarmuka Tab ke Office, dan Membuat Pekerjaan Anda Jauh Lebih Mudah
- Aktifkan pengeditan dan pembacaan tab di Word, Excel, PowerPoint, Publisher, Access, Visio, dan Project.
- Buka dan buat banyak dokumen di tab baru di jendela yang sama, bukan di jendela baru.
- Meningkatkan produktivitas Anda sebesar 50%, dan mengurangi ratusan klik mouse untuk Anda setiap hari!
")