Bagaimana cara melihat domain pengirim di daftar surat di Outlook?
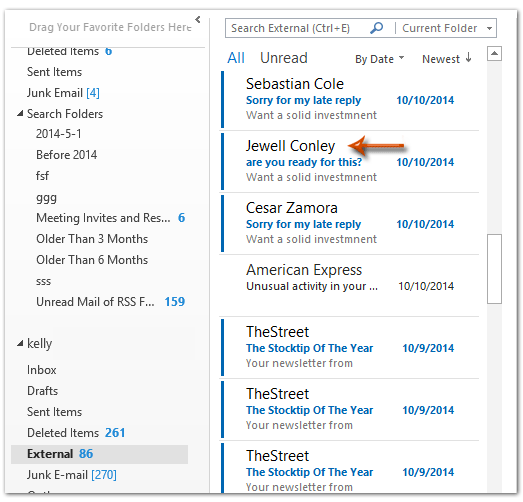
Di Outlook, pernahkah Anda menerima beberapa pesan email dari pengirim aneh dengan hanya menampilkan nama tampilan pengirim di daftar email? Lihat screen shot berikut ini. Beberapa pengguna Outlook mungkin berpikir akan lebih aman untuk mendapatkan domain email pengirim sebelum membuka pesan email mereka. Pada artikel ini, saya akan menunjukkan kepada Anda cara melihat atau menampilkan domain email pengirim ke dalam daftar surat di Microsoft Outlook.
- Otomatiskan pengiriman email dengan CC / BCC Otomatis, Maju Otomatis berdasarkan aturan; mengirim Balas otomatis (Di Luar Kantor) tanpa memerlukan server pertukaran...
- Dapatkan pengingat seperti Peringatan BCC saat membalas semua saat Anda berada di daftar BCC, dan Ingatkan Saat Lampiran Hilang untuk lampiran yang terlupakan...
- Tingkatkan efisiensi email dengan Balas (Semua) Dengan Lampiran, Tambahkan Ucapan atau Tanggal & Waktu secara Otomatis ke Tanda Tangan atau Subjek, Balas Beberapa Email...
- Sederhanakan pengiriman email dengan Ingat Email, Alat Lampiran (Kompres Semua, Simpan Otomatis Semua...), Hapus Duplikat, dan Laporan Cepat...
Untuk melihat atau menampilkan domain email pengirim ke dalam milis di Microsoft Outlook, Anda dapat mengikuti cara berikut untuk mendapatkannya.
Langkah 1: Buka folder surat di mana Anda akan melihat atau menampilkan domain email pengirim.
Langkah 2: Klik Tambah Kolom tombol pada View Tab.
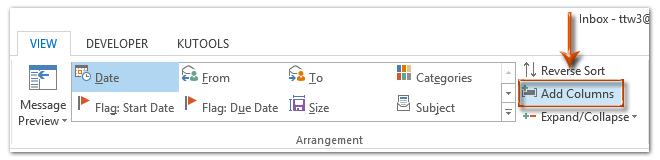
Note: Di Outlook 2007, Anda dapat mengklik View > Pandangan saat ini > Sesuaikan Tampilan Saat Ini, lalu klik Fields di Customize View: kotak dialog Compact.
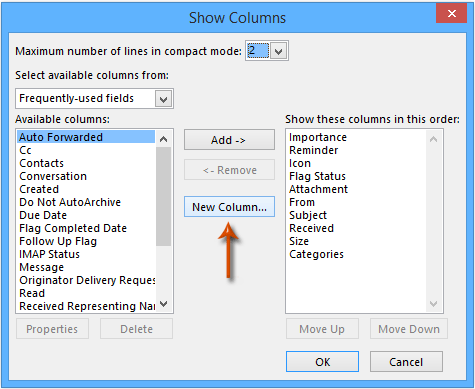
Langkah 3: Di kotak dialog Perlihatkan Kolom (atau Tampilkan Bidang), klik Kolom baru tombol (atau Lapangan baru tombol).
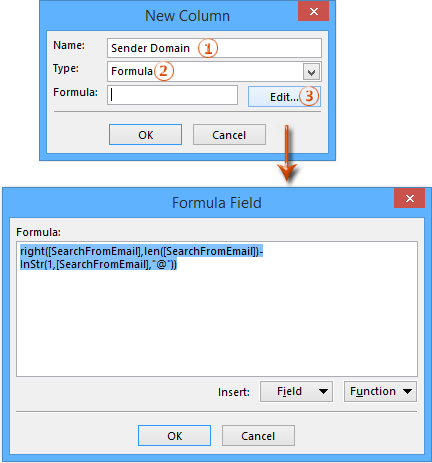
Langkah 3: Sekarang Anda masuk ke kotak dialog Kolom Baru (atau Bidang Baru), dan:
(1) Dalam Nama kotak, masukkan nama baru untuk kolom pembuatan ini.
(2) Klik Tipe kotak, dan pilih Rumus dari daftar drop down.
(3) Klik Edit tombol, lalu masukkan teks berikut ke dalam Rumus kotak kotak dialog. Lihat tangkapan layar di bawah ini:
kanan ([SearchFromEmail], len ([SearchFromEmail]) - InStr (1, [SearchFromEmail], "@"))
(4) Klik keduanya OK tombol untuk menutup dua kotak dialog.
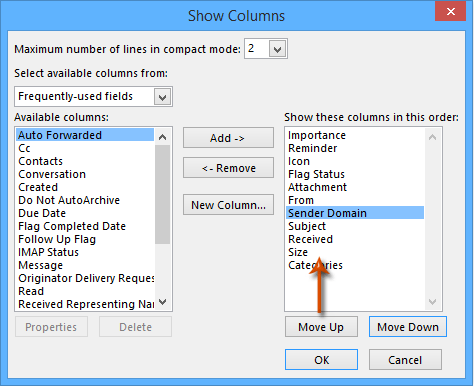
Langkah 4: Sekarang Anda kembali ke kotak dialog Show Columns (atau Show Fields), pilih kolom yang baru dibuat di yang Tampilkan kolom ini dalam urutan ini kotak, dan pindahkan ke bawah Dari. Lihat tangkapan layar di bawah ini:
Langkah 5: Klik OK tombol (s).
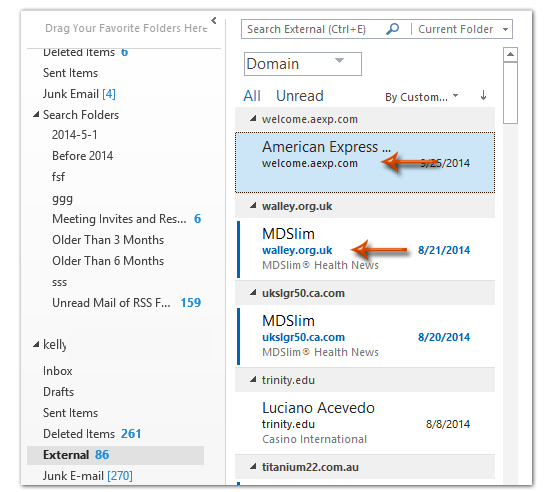
Sekarang Anda akan melihat domain email setiap pengirim ditambahkan dan ditampilkan di bawah nama tampilan pengirim. Lihat screen shot berikut ini:
Untuk mendapatkan metode untuk menyimpan tampilan kustom ini di Outlook, silakan klik Bagaimana cara menyimpan dan menyalin pengaturan tampilan ke folder lain di Outlook?
 Artikel terkait
Bagaimana cara mengurutkan dan mengelompokkan berdasarkan domain pengirim di Outlook?
Alat Produktivitas Kantor Terbaik
Kutools untuk Outlook - Lebih dari 100 Fitur Canggih untuk Meningkatkan Outlook Anda
🤖 Asisten Surat AI: Email profesional instan dengan keajaiban AI--satu klik untuk mendapatkan balasan jenius, nada sempurna, penguasaan multibahasa. Ubah email dengan mudah! ...
📧 Email Otomatis: Di Luar Kantor (Tersedia untuk POP dan IMAP) / Jadwal Kirim Email / Auto CC/BCC Sesuai Aturan Saat Mengirim Email / Penerusan Otomatis (Aturan Lanjutan) / Tambah Salam Otomatis / Secara Otomatis Membagi Email Multi-Penerima menjadi Pesan Individual ...
📨 email Management: Mengingat Email dengan Mudah / Blokir Email Penipuan berdasarkan Subjek dan Lainnya / Hapus Email Duplikat / Pencarian / Konsolidasi Folder ...
📁 Lampiran Pro: Penyimpanan Batch / Pelepasan Batch / Kompres Batch / Penyimpanan otomatis / Lepaskan Otomatis / Kompres Otomatis ...
🌟 Antarmuka Ajaib: 😊Lebih Banyak Emoji Cantik dan Keren / Tingkatkan Produktivitas Outlook Anda dengan Tampilan Tab / Minimalkan Outlook Daripada Menutup ...
👍 Keajaiban sekali klik: Balas Semua dengan Lampiran Masuk / Email Anti-Phishing / 🕘Tampilkan Zona Waktu Pengirim ...
👩🏼🤝👩🏻 Kontak & Kalender: Batch Tambahkan Kontak Dari Email yang Dipilih / Bagi Grup Kontak menjadi Grup Individual / Hapus Pengingat Ulang Tahun ...
Lebih 100 Fitur Tunggu Eksplorasi Anda! Klik Di Sini untuk Menemukan Lebih Banyak.

