Bagaimana cara mengirim pembaruan rapat ke satu peserta (baru) hanya di Outlook?
Katakanlah Anda telah mengirimkan undangan rapat melalui Outlook ke banyak orang, dan Anda telah membuat jadwal rapat serta mencatat proses perencanaan dalam rapat tersebut. Sekarang Anda hanya perlu mengirim proses panning ke manajer Anda, bagaimana Anda bisa melakukannya? Sebenarnya, Microsoft Outlook memungkinkan pengguna mengirim pembaruan rapat hanya kepada satu atau peserta baru.
- Otomatiskan pengiriman email dengan CC / BCC Otomatis, Maju Otomatis berdasarkan aturan; mengirim Balas otomatis (Di Luar Kantor) tanpa memerlukan server pertukaran...
- Dapatkan pengingat seperti Peringatan BCC saat membalas semua saat Anda berada di daftar BCC, dan Ingatkan Saat Lampiran Hilang untuk lampiran yang terlupakan...
- Tingkatkan efisiensi email dengan Balas (Semua) Dengan Lampiran, Tambahkan Ucapan atau Tanggal & Waktu secara Otomatis ke Tanda Tangan atau Subjek, Balas Beberapa Email...
- Sederhanakan pengiriman email dengan Ingat Email, Alat Lampiran (Kompres Semua, Simpan Otomatis Semua...), Hapus Duplikat, dan Laporan Cepat...
Untuk mengirim pembaruan rapat hanya ke satu peserta di Microsoft Outlook, Anda dapat melakukan hal berikut:
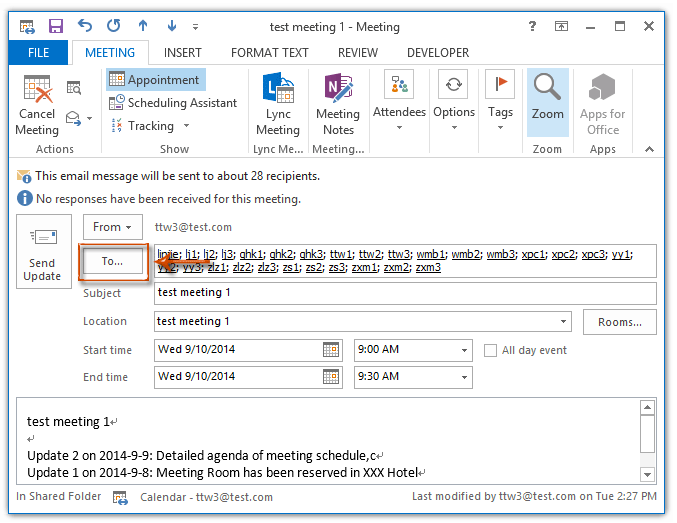
Langkah 1: Geser ke tampilan Kalender, dan buka rapat yang akan Anda kirim pembaruan rapat ke satu peserta saja, dan perbarui rapat Anda juga.
Langkah 2: Di jendela Rapat, klik Untuk .
Langkah 3: Di kotak dialog Pilih Peserta dan Sumber Daya yang akan datang, cari tahu dan pilih peserta yang akan Anda kirimi pembaruan, klik Wajib -> tombol, lalu klik tombol OK .
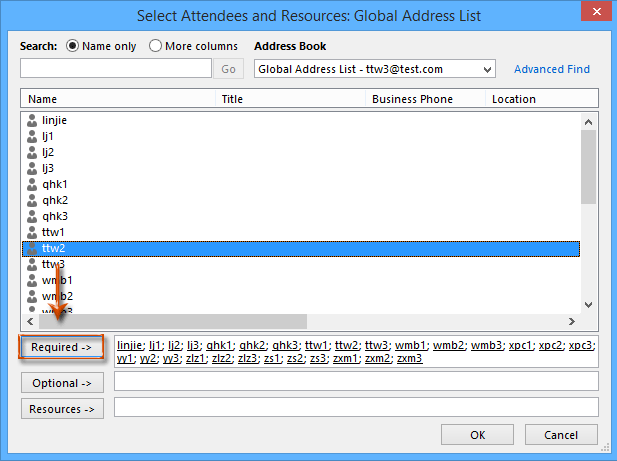
Catatan: Jika Anda dapat mengingat alamat email peserta dengan jelas, lewati Langkah 2 dan Langkah 3, dan cukup masukkan alamat email peserta ke Untuk lapangan secara langsung.
Langkah 4: Sekarang Anda kembali ke jendela Rapat, klik Kirim Pembaruan .
Langkah 5: Pada kotak dialog Send Update to Attendees yang bermunculan, centang opsi Kirim pembaruan hanya untuk peserta yang ditambahkan atau dihapus, dan klik OK .
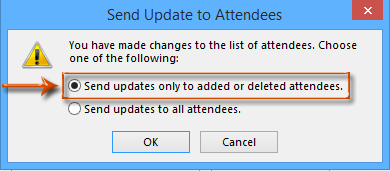
Catatan: Meskipun peserta baru yang ditambahkan disertakan dalam peserta utama yang Anda kirim ke undangan rapat untuk pertama kalinya, peserta duplikat akan dihapus secara otomatis setelah mengirim pembaruan rapat.
Alat Produktivitas Kantor Terbaik
Kutools untuk Outlook - Lebih dari 100 Fitur Canggih untuk Meningkatkan Outlook Anda
🤖 Asisten Surat AI: Email profesional instan dengan keajaiban AI--satu klik untuk mendapatkan balasan jenius, nada sempurna, penguasaan multibahasa. Ubah email dengan mudah! ...
📧 Email Otomatis: Di Luar Kantor (Tersedia untuk POP dan IMAP) / Jadwal Kirim Email / Auto CC/BCC Sesuai Aturan Saat Mengirim Email / Penerusan Otomatis (Aturan Lanjutan) / Tambah Salam Otomatis / Secara Otomatis Membagi Email Multi-Penerima menjadi Pesan Individual ...
📨 email Management: Mengingat Email dengan Mudah / Blokir Email Penipuan berdasarkan Subjek dan Lainnya / Hapus Email Duplikat / Pencarian / Konsolidasi Folder ...
📁 Lampiran Pro: Penyimpanan Batch / Pelepasan Batch / Kompres Batch / Penyimpanan otomatis / Lepaskan Otomatis / Kompres Otomatis ...
🌟 Antarmuka Ajaib: 😊Lebih Banyak Emoji Cantik dan Keren / Tingkatkan Produktivitas Outlook Anda dengan Tampilan Tab / Minimalkan Outlook Daripada Menutup ...
👍 Keajaiban sekali klik: Balas Semua dengan Lampiran Masuk / Email Anti-Phishing / 🕘Tampilkan Zona Waktu Pengirim ...
👩🏼🤝👩🏻 Kontak & Kalender: Batch Tambahkan Kontak Dari Email yang Dipilih / Bagi Grup Kontak menjadi Grup Individual / Hapus Pengingat Ulang Tahun ...
Lebih 100 Fitur Tunggu Eksplorasi Anda! Klik Di Sini untuk Menemukan Lebih Banyak.

