Loncat ke daftar isi utama

Bagaimana cara memperbesar atau memperbesar sel yang dipilih di Excel? 

Seperti yang kita semua tahu, Excel memiliki fitur Zoom untuk membantu kita meningkatkan ukuran nilai sel di seluruh lembar kerja. Tapi, terkadang, kita hanya perlu memperbesar atau memperbesar sel yang dipilih saja. Adakah ide bagus bagi kami untuk memperbesar sel yang dipilih hanya di lembar kerja?

Zoom atau perbesar sel yang dipilih dengan kode VBA


Zoom atau perbesar sel yang dipilih dengan kode VBA

Mungkin tidak ada cara langsung bagi kami untuk memperbesar sel yang dipilih di Excel, tetapi, di sini, saya dapat memperkenalkan kode VBA untuk menangani pekerjaan ini sebagai solusi. Harap lakukan sebagai berikut:

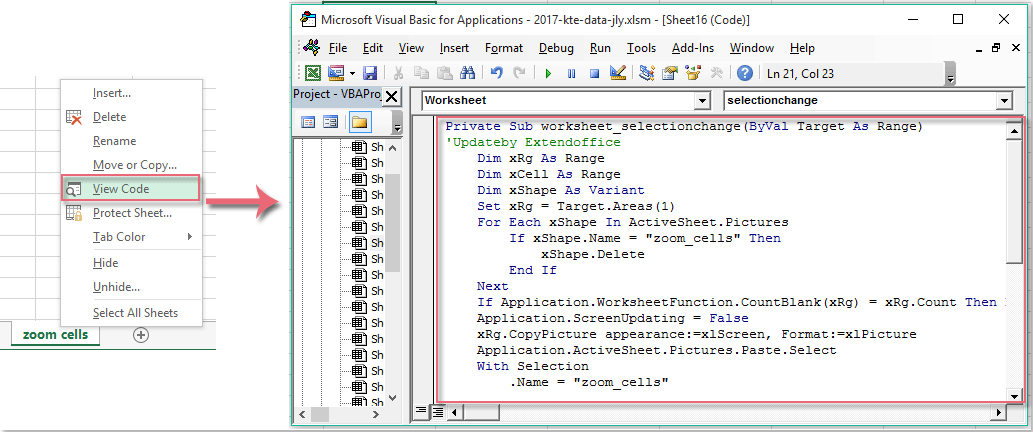
1. Klik kanan tab lembar yang Anda inginkan untuk memperbesar sel yang dipilih secara otomatis, lalu pilih Lihat kode dari menu konteks, di buka Microsoft Visual Basic untuk aplikasi jendela, salin dan tempel kode berikut ke dalam Modul kosong:

Kode VBA: Memperbesar atau memperbesar sel yang dipilih:

Private Sub worksheet_selectionchange(ByVal Target As Range)
'Updateby Extendoffice
    Dim xRg As Range
    Dim xCell As Range
    Dim xShape As Variant
    Set xRg = Target.Areas(1)
    For Each xShape In ActiveSheet.Pictures
        If xShape.Name = "zoom_cells" Then
            xShape.Delete
        End If
    Next
    If Application.WorksheetFunction.CountBlank(xRg) = xRg.Count Then Exit Sub
    Application.ScreenUpdating = False
    xRg.CopyPicture appearance:=xlScreen, Format:=xlPicture
    Application.ActiveSheet.Pictures.Paste.Select
    With Selection
        .Name = "zoom_cells"
        With .ShapeRange
            .ScaleWidth 1.5, msoFalse, msoScaleFromTopLeft
            .ScaleHeight 1.5, msoFalse, msoScaleFromTopLeft
            With .Fill
                .ForeColor.SchemeColor = 44
                .Visible = msoTrue
                .Solid
                .Transparency = 0
            End With
        End With
    End With
    xRg.Select
    Application.ScreenUpdating = True
    Set xRg = Nothing
End Sub

2. Kemudian simpan dan tutup jendela kode ini, sekarang, ketika Anda memilih atau mengklik beberapa sel data, sel akan diperbesar seperti gambar secara otomatis, lihat tangkapan layar:

Note: Sel yang dipilih akan diubah kembali ke ukuran aslinya setelah memilih sel lain.

Alat Produktivitas Kantor Terbaik

馃 Kutools AI Ajudan: Merevolusi analisis data berdasarkan: Eksekusi Cerdas   |  Hasilkan Kode  |  Buat Rumus Khusus  |  Analisis Data dan Hasilkan Grafik  |  Aktifkan Fungsi Kutools...
Fitur Populer: Temukan, Sorot, atau Identifikasi Duplikat   |  Hapus Baris Kosong   |  Gabungkan Kolom atau Sel tanpa Kehilangan Data   |   Putaran tanpa Formula ...
Pencarian Super: VLookup Beberapa Kriteria    VLookup Nilai Berganda  |   VLookup di Beberapa Lembar   |   Pencarian Fuzzy ....
Daftar Drop-down Lanjutan: Buat Daftar Drop Down dengan Cepat   |  Daftar Drop Down yang Bergantung   |  Multi-pilih Drop Down List ....
Manajer Kolom: Tambahkan Jumlah Kolom Tertentu  |  Pindahkan Kolom  |  Alihkan Status Visibilitas Kolom Tersembunyi  |  Bandingkan Rentang & Kolom ...
Fitur Unggulan: Fokus Kisi   |  Tampilan Desain   |   Bar Formula Besar    Manajer Buku Kerja & Lembar   |  Perpustakaan Sumberdaya (Teks otomatis)   |  Pemetik tanggal   |  Gabungkan Lembar Kerja   |  Enkripsi/Dekripsi Sel    Kirim Email berdasarkan Daftar   |  Filter Super   |   Filter Khusus (filter tebal/miring/coret...) ...
15 Perangkat Teratas12 Teks Tools (Tambahkan Teks, Hapus Karakter, ...)   |   50 + Grafik jenis (Gantt Chart, ...)   |   40+ Praktis Rumus (Hitung usia berdasarkan ulang tahun, ...)   |   19 Insersi Tools (Masukkan Kode QR, Sisipkan Gambar dari Jalur, ...)   |   12 Konversi Tools (Angka ke Kata, Konversi Mata Uang, ...)   |   7 Gabungkan & Pisahkan Tools (Lanjutan Gabungkan Baris, Pisahkan Sel, ...)   |   ... dan banyak lagi

Tingkatkan Keterampilan Excel Anda dengan Kutools for Excel, dan Rasakan Efisiensi yang Belum Pernah Ada Sebelumnya. Kutools for Excel Menawarkan Lebih dari 300 Fitur Lanjutan untuk Meningkatkan Produktivitas dan Menghemat Waktu.  Klik Di Sini untuk Mendapatkan Fitur yang Paling Anda Butuhkan...

Deskripsi Produk


Tab Office Membawa antarmuka Tab ke Office, dan Membuat Pekerjaan Anda Jauh Lebih Mudah

  • Aktifkan pengeditan dan pembacaan tab di Word, Excel, PowerPoint, Publisher, Access, Visio, dan Project.
  • Buka dan buat banyak dokumen di tab baru di jendela yang sama, bukan di jendela baru.
  • Meningkatkan produktivitas Anda sebesar 50%, dan mengurangi ratusan klik mouse untuk Anda setiap hari!
Comments (10)
No ratings yet. Be the first to rate!
This comment was minimized by the moderator on the site
Ragazzi perso cos' non posso correggere la singola cella...esiste un modo per ingrandire la singola cella una volta selezionata e lavorarci sopra ?
This comment was minimized by the moderator on the site
Hi,
This is great - thank you.

Would it be possible to only have this on a selection of cells on a sheet? For example, all cells in column A, or A3 to A26 for example?
Thank you!
Rhys
This comment was minimized by the moderator on the site
Hi,
I am using Mac-Air and it shows only the color when you click on ac particular cell, pls guide.
This comment was minimized by the moderator on the site
I have the same issue on my MBA M2 running Excel V16.62, blue background but no text seen
This comment was minimized by the moderator on the site
Error 1004 on line 15

Application.ActiveSheet.Pictures.Paste.Select

Why?, what could it be?
This comment was minimized by the moderator on the site
Hi, Mazzi,
The above code works well in my Excel workbook, which Excel version do you use?
This comment was minimized by the moderator on the site
I want to magnify when entering the data
This comment was minimized by the moderator on the site
Hi,
May be, there is no direct way for solving your problem, if you find a good method, please comment here.
This comment was minimized by the moderator on the site
this is cool, but i want it to run in all sheets, how can i do that?
This comment was minimized by the moderator on the site
Hi, Ahmet,
To apply this operation in all worksheets, you can use the below vba code. (You should put the code into the ThisWorkbook module).Please try it.
Private Sub Workbook_SheetSelectionChange(ByVal sh As Object, ByVal Target As Range)
Dim xRg As Range
Dim xCell As Range
Dim xShape As Variant
Set xRg = Target.Areas(1)
For Each xShape In ActiveSheet.Pictures
If xShape.Name = "zoom_cells" Then
xShape.Delete
End If
Next
If Application.WorksheetFunction.CountBlank(xRg) = xRg.Count Then Exit Sub
Application.ScreenUpdating = False
xRg.CopyPicture appearance:=xlScreen, Format:=xlPicture
Application.ActiveSheet.Pictures.Paste.Select
With Selection
.Name = "zoom_cells"
With .ShapeRange
.ScaleWidth 1.5, msoFalse, msoScaleFromTopLeft
.ScaleHeight 1.5, msoFalse, msoScaleFromTopLeft
With .Fill
.ForeColor.SchemeColor = 44
.Visible = msoTrue
.Solid
.Transparency = 0
End With
End With
End With
xRg.Select
Application.ScreenUpdating = True
Set xRg = Nothing
End Sub
There are no comments posted here yet
Please leave your comments in English
Posting as Guest
Rate this post:
0   Characters
Suggested Locations